A hardware teardown photo has two jobs. It should be clear enough to follow, but it must also preserve the tiny details that support the explanation: connector labels, screw positions, cable direction, shielding seams, and part numbers. A cleaner image is not automatically a more useful technical image. It can look polished while losing the one mark a reader needs.
The safest approach is to classify pixels before choosing an editing route. An AI Photo Editor can make a candidate through object erasure, enhancement, upscaling, or another bounded change. The editor still has to decide which pixels are cosmetic clutter and which pixels are evidence. That choice determines whether the candidate belongs in a how-to guide or only in a decorative thumbnail.
Connector Labels and Screw Positions Carry Technical Evidence
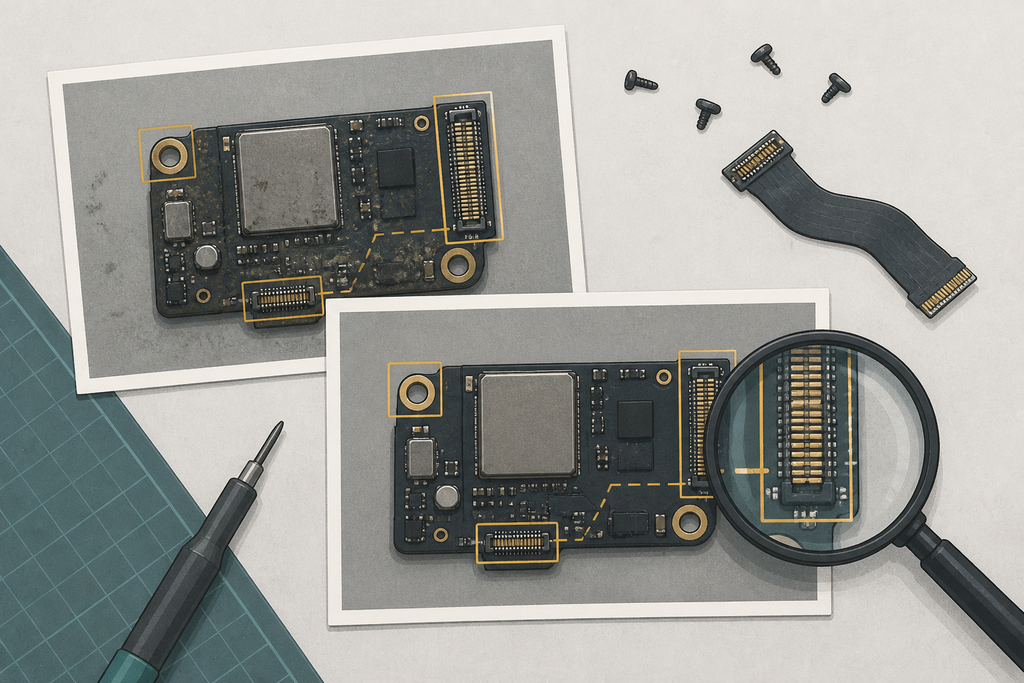
Open the untouched frame and mark every detail that could change a reader’s action. A dust speck on the work mat is probably cosmetic. A printed triangle beside a ribbon cable is not. Treat labels, connector edges, fastener heads, orientation marks, and visible damage as proof-bearing pixels. They should survive the edit with their shape and position intact.
Separate Labels from Cosmetic Dust and Glare
Dust, glare, and a label may occupy the same small area. Removing a bright reflection could make a printed code easier to see, but it could also redraw a weak character. Draw a protected box around every label before requesting cleanup. If the source never establishes whether a mark is a three or an eight, the edited file must not pretend to settle it.
This boundary also applies to corrosion, cracks, and burn marks. They may look like defects in the photograph, yet they are often the subject of the teardown. Cosmetic cleanup must not erase the physical evidence that explains why a component failed.
Freeze Connector Edges and Fastener Positions
Mechanical position matters even when no text is present. A keyed connector, missing screw, lifted shield, or reversed cable can change the entire repair instruction. Mark those edges and positions on a separate review copy. The marks do not go into the published image; they form a checklist for comparing the candidate with the source.
Keep the camera angle in the protected set as well. A generated change that subtly rotates a board or straightens a cable may make the composition cleaner while weakening the relationship between the image and the written step.
Match Each Defect to One Editing Route
PicEditor AI lists separate routes for Erase Object, Enhance Photo, and Upscale Image. Pick a route only after naming the visible defect. A photo editing tool should receive one bounded request at a time. The editor brings the evidence map and uses the photo editing tool only on the marked problem. Combining dust removal, lighting repair, label sharpening, and background replacement in one prompt makes it harder to locate the source of a changed detail.
| Visible problem | Candidate route | Technical boundary |
| Loose debris outside the device | Erase Object | Do not touch board edges, tools, or loose parts being documented |
| Low contrast across an already visible part | Enhance Photo | Compare every label and damage mark with the source |
| Small image needed at a larger display size | Upscale Image | Do not treat newly crisp marks as new evidence |
Use Erase Object Outside Protected Evidence Zones
Object erasure fits debris or a distracting item only when it sits outside the device and outside the repair story. A removed screwdriver may be harmless in a cover image but misleading in a step that uses its position to show scale or access. Review the filled background for repeated textures and warped edges that creep into the protected area.
Choose Enhance Photo for Visible Low-Contrast Detail
Enhancement is appropriate when the source already contains the information and the goal is easier viewing. It cannot establish a character hidden by glare or a trace concealed under a shield. Run the candidate beside the original at the same scale. If the enhanced version appears to reveal a new letter, pin, or crack, mark it as uncertain and return to the source.
Use Upscale Image Without Claiming New Evidence
Upscaling can create a larger candidate for a page layout, but added sharpness is not the same as captured detail. Use it to improve presentation at a larger display size, not to infer a serial number or component value. The AI Photo Editor remains part of the presentation workflow; the original camera frame remains the evidence.
Native Scale Reveals Altered Labels and Connector Edges
Review both files at native size before judging the final layout. A thumbnail hides altered characters, softened connector teeth, and small repeated patterns. Use the protected boxes from the first step and compare them in a fixed order. The order matters because it prevents the eye from spending all its attention on the most dramatic improvement.
Blink Between Frames to Find Structural Drift
Align the source and candidate, then alternate between them. Watch board corners, cable paths, port openings, and screw heads. A shift that looks minor on its own becomes obvious when the frames switch. If alignment is impossible because the candidate changed perspective or scale unevenly, reject it for instructional use.
Do not correct structural drift with another generated pass. Return to the source and narrow the request. Stacking edits makes it harder to tell when a connector changed and which version introduced the change.
Read Every Label Before Approving the Derivative
Read each visible label character by character in the source and candidate. Record three outcomes: same, clearly different, or unreadable in at least one frame. Only the first outcome passes. Unreadable is not a soft pass, and a plausible replacement is not proof. When a label matters, keep it from the untouched capture or take a better photograph.
The same test applies to printed arrows and polarity marks. A single reversed symbol can turn a useful repair guide into a damaging instruction.
Know the Limits of Missing Technical Evidence
No editing route can recover evidence the camera did not capture. If glare, motion blur, or low resolution hides a label in the source, reshoot the part or describe the uncertainty in the article. Do not promote a generated character into a factual identifier. The boundary is strict because readers may act on that detail.
Every Published Teardown Needs Its Untouched Frame Nearby
Store the untouched frame, the approved derivative, and the protected-pixel review copy together. A published guide may use the cleaner derivative, while a link or internal archive keeps the source available for fact checking. That pairing lets a later editor verify whether a disputed label came from the camera or the editing step.
PicEditor AI is useful here when the problem has been classified and the requested change stays outside the evidence boundary. It is less useful when the team hopes polish will replace a missing capture. A PicEditor AI candidate earns publication only through comparison with the camera frame. Choose the route by defect, compare at native scale, and publish only the derivative that leaves every technical claim anchored to the original.